
Learn how to start automated trading with RelayDesk using the popular UT Bot indicator from TradingView. No custom signals required, get started in 15 minutes.
Introduction
One of the biggest misconceptions about trading automation is that you need proprietary indicators or custom Pine Script strategies to get started. The reality? You can begin automating your trades today using proven, publicly available indicators that thousands of traders already trust.
Enter the UT Bot, a momentum-based indicator with over 100,000 users on TradingView. Combined with RelayDesk’s intelligent execution engine, you can transform these simple buy/sell signals into a fully automated trading system with sophisticated exit strategies and risk management. Best part? You’ll be up and running in under 15 minutes.
The Perfect Starting Point for Automation
What is UT Bot?
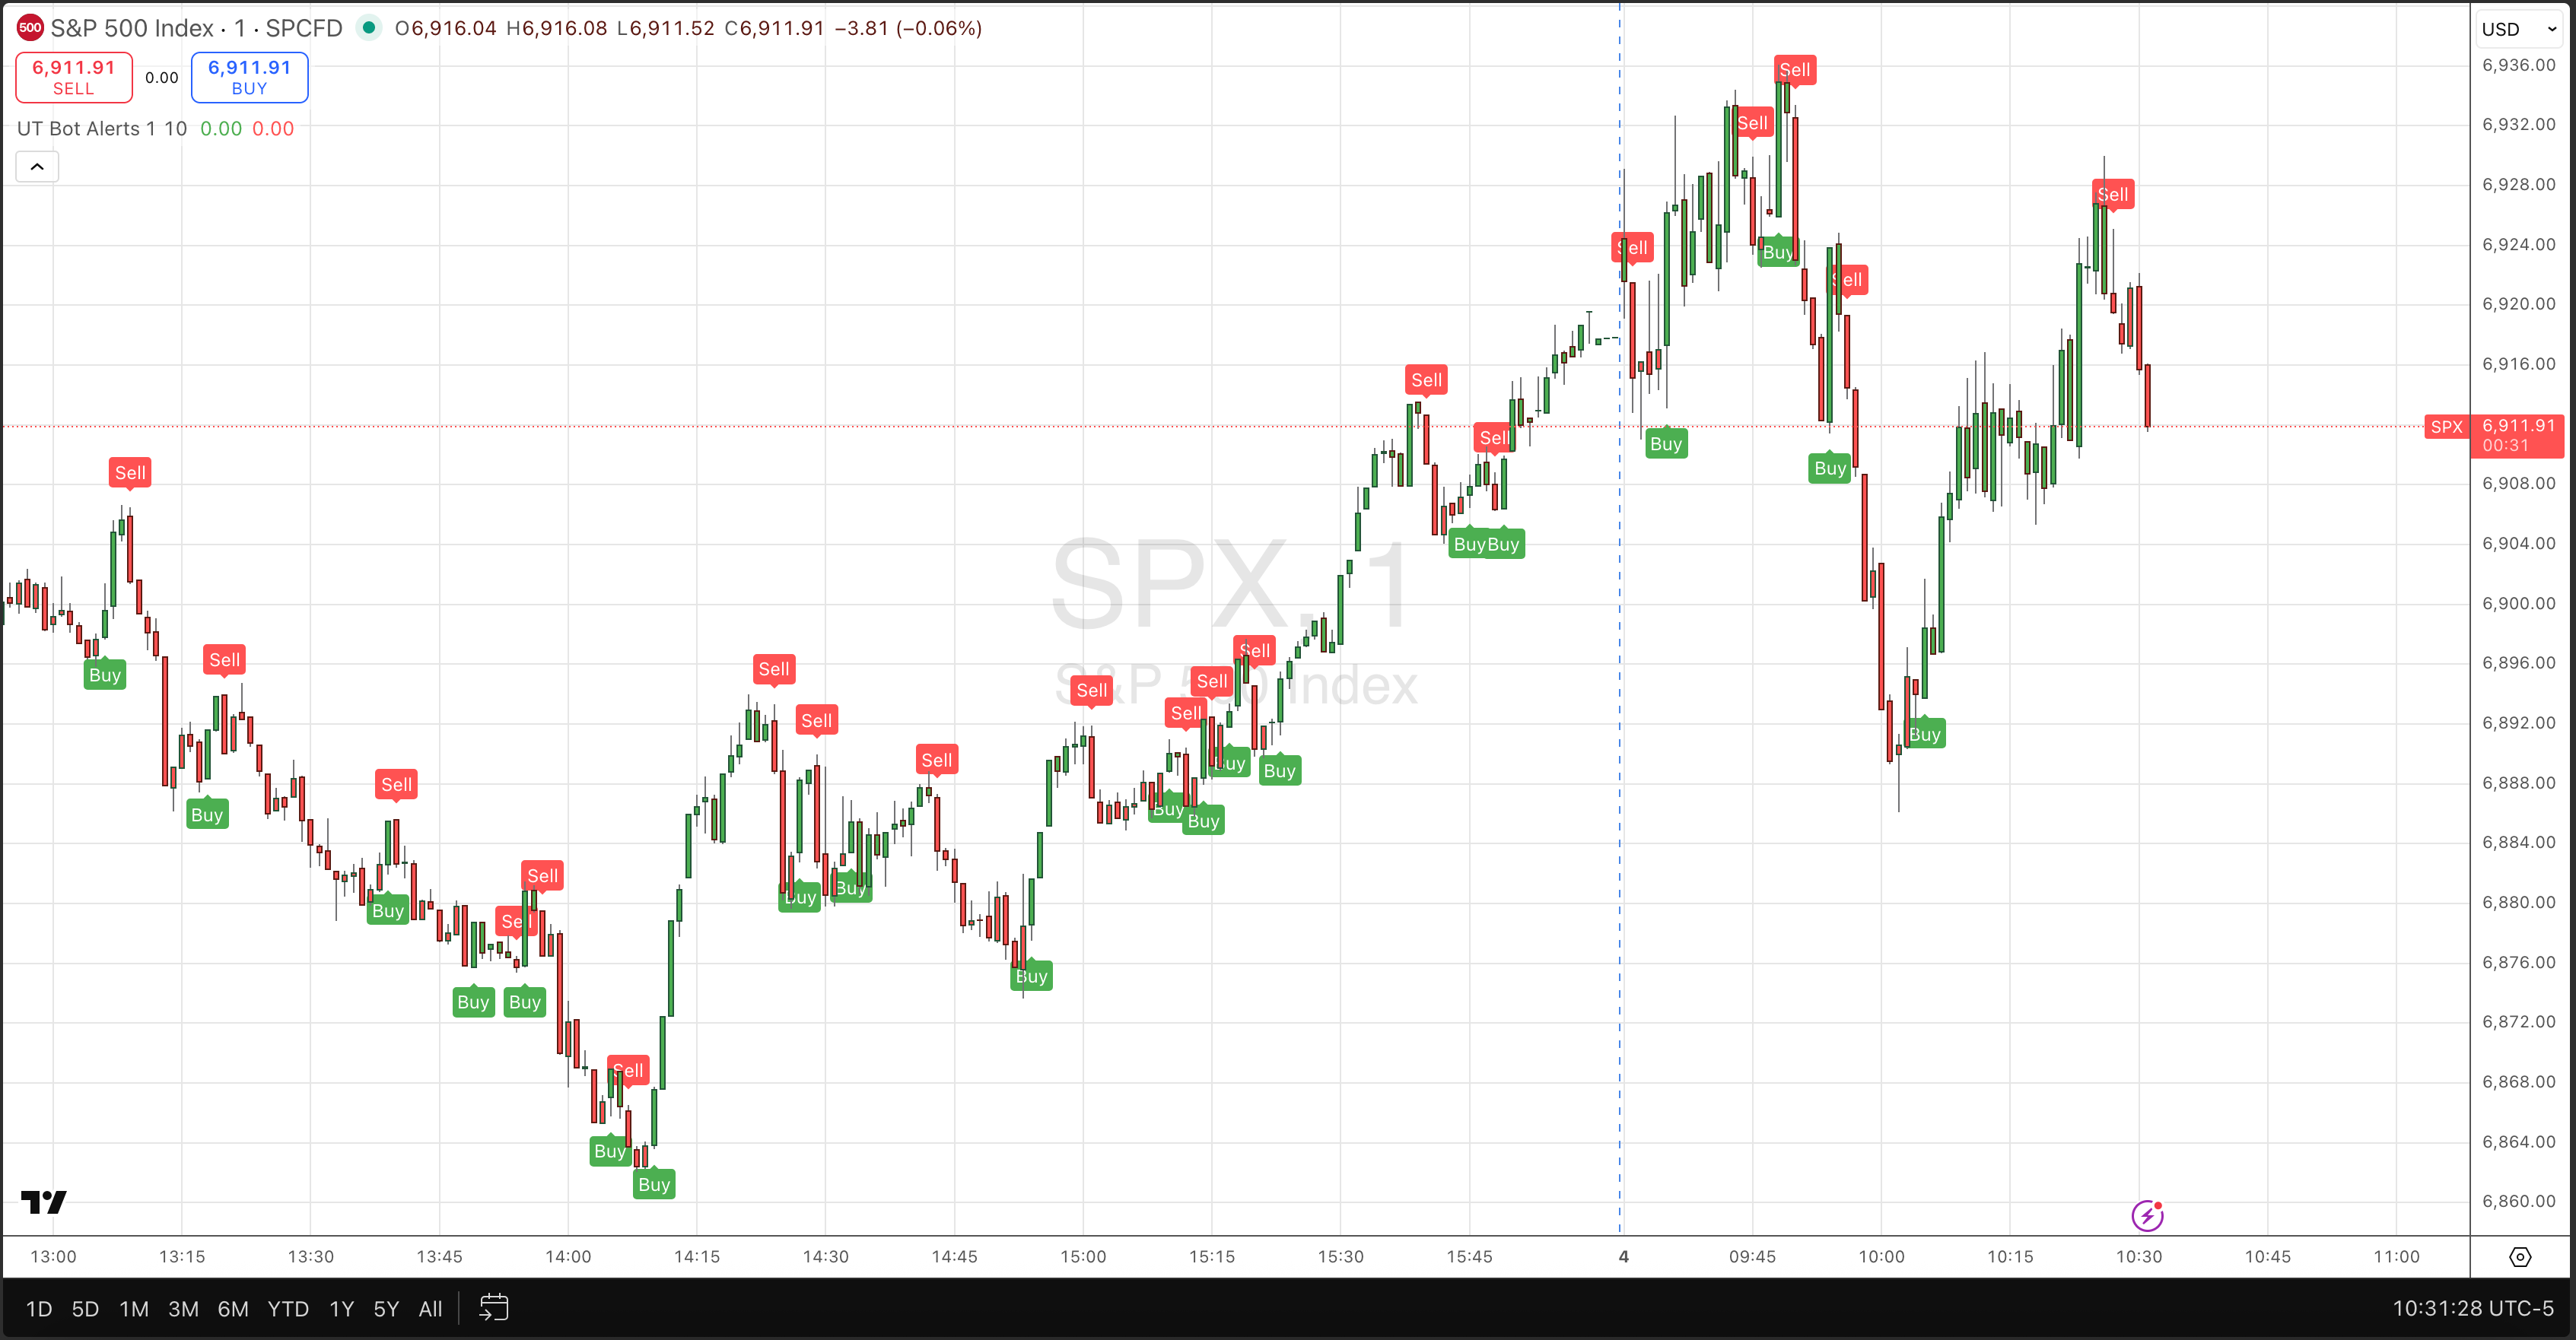
The UT Bot is a trend-following indicator built on Average True Range (ATR) calculations. It generates clear buy and sell signals by identifying momentum shifts in price action. What makes it particularly beginner-friendly is its simplicity, just two main parameters to adjust (Key Value and ATR Period) and unmistakable visual signals on your chart.
Unlike complex multi-indicator setups, the UT Bot has been battle-tested across multiple markets and timeframes by a massive community. This means you’re not experimenting with untested logic, you’re building on a foundation that thousands of traders have already validated. Further, it’s a good foundation to build out more customization as you build your trading and Pine Script acumen.
Why This Combination Works
Here’s where RelayDesk transforms a simple indicator into a complete trading system:
- UT Bot provides the signals – Clear entry points based on momentum
- RelayDesk provides intelligent execution – OCO exit engines, trailing stops, position sizing
- Together = Strategy → Alpha – No coding, no manual order placement, no missed signals
While UT Bot tells you when to enter, RelayDesk handles the critical question of when and how to exit. This is where most traders lose their edge, and where RelayDesk’s advanced exit strategies (OCO orders, trailing stops from entry, MFE/MAE analytics) turn good signals into consistent execution.
TGIP Reminder
Always paper trade first. The UT Bot works across multiple timeframes and markets—test your settings before going live. As our community says: Thank God It’s Paper.
From TradingView to Live Automation in 5 Steps
Step 1: Add UT Bot to Your Chart
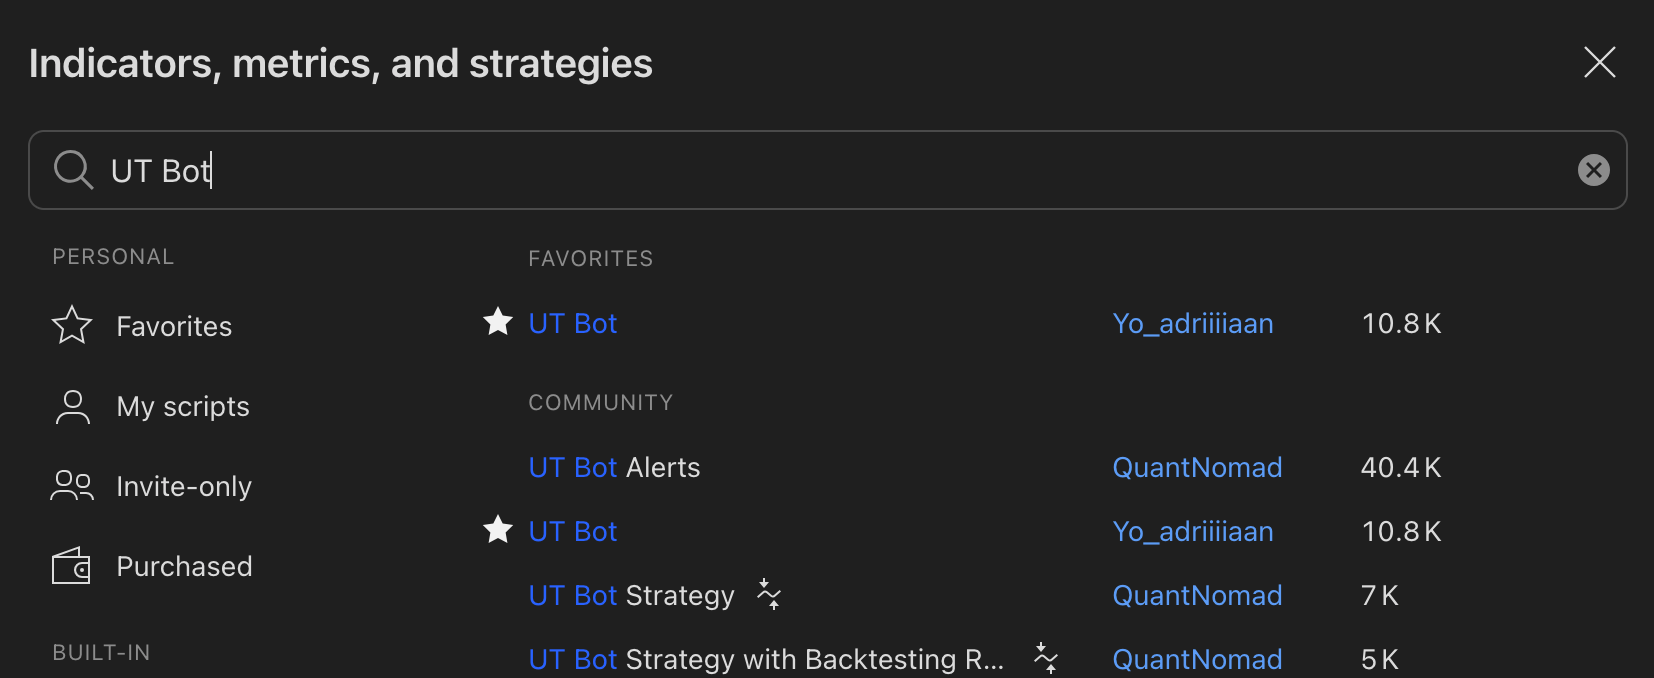
Open TradingView and navigate to any chart. Click the Indicators button at the top of your chart, then search for “UT Bot” in the search bar. You’re looking for the indicator by Yo_adriiiiaan with the red/green Buy/Sell signal arrows. You can also access it directly at this TradingView link.
Add it to your preferred chart and timeframe. Start with a 15-minute or 1-hour chart if you’re new to this; these timeframes provide a good balance between signal frequency and noise reduction.
Step 2: Configure Your UT Bot Settings
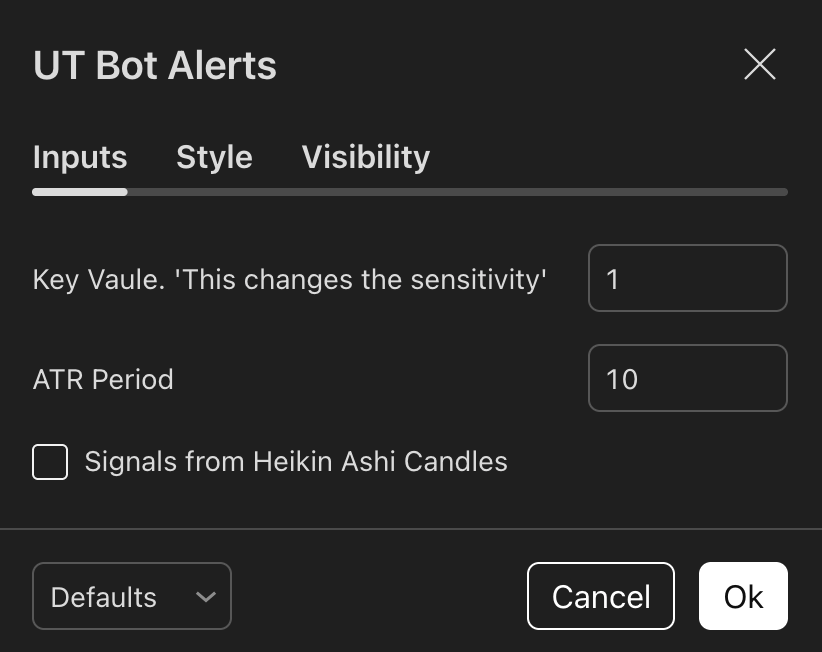
Click the gear icon next to UT Bot in your indicators list to open settings. The two parameters that matter most:
- Key Value (Sensitivity): Controls how sensitive the indicator is to price movements. Lower = more signals. Start with the default value of 1.
- ATR Period: The lookback period for volatility calculation. Default is 10, which works well for most assets.
Recommended starting configurations by trading style:
- Scalping/Day Trading: 1-5 minute charts, Key Value 1-2
- Swing Trading: 1H-4H charts, Key Value 2-3
- Position Trading: Daily charts, Key Value 3-4
[IMAGE 3: UT Bot settings panel]
Alt text: UT Bot settings panel showing Key Value and ATR Period parameters highlighted
Caption: The two critical parameters: Key Value and ATR Period
Step 3: Create TradingView Alert
This is where TradingView connects to RelayDesk. Right-click anywhere on your chart and select “Add Alert” (or press Alt+A).
Alert Configuration:
- Condition: Select “UT Bot” then choose either “Buy” or “Sell” (create separate alerts for each)
- Alert name: Something descriptive like “UT Bot BTC 15m Buy”
- Frequency: “Once Per Bar Close” (critical for avoiding false signals)
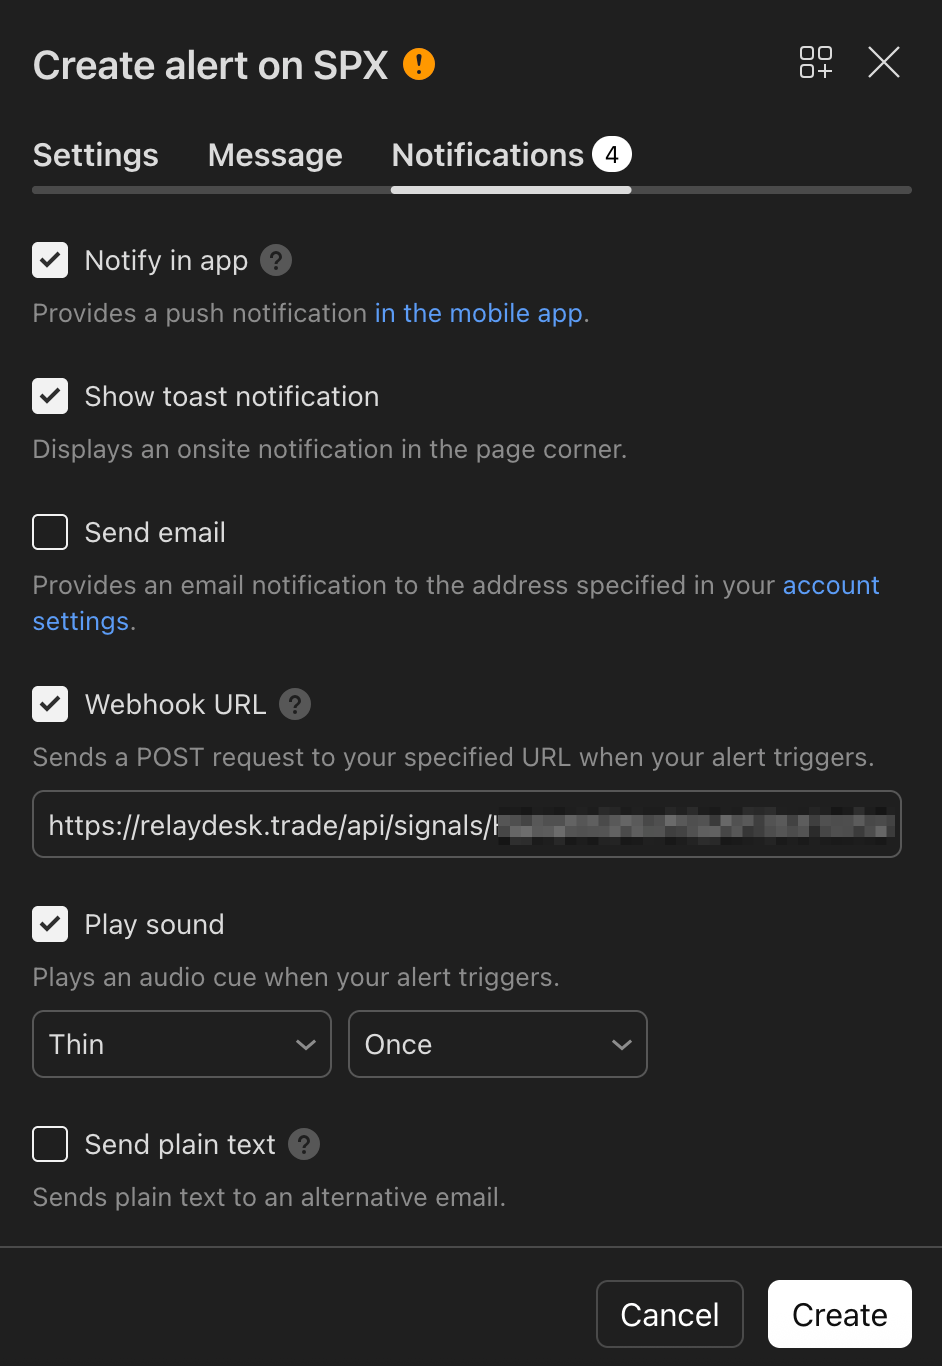
Message format for RelayDesk webhook:
Entry DetectedRelayDesk simply looks for a message to the webhook endpoint.
Webhook URL: Navigate to your RelayDesk dashboard → Signals → Create New Signal → Copy the unique webhook URL provided. Paste this into the “Webhook URL” field in your TradingView alert.
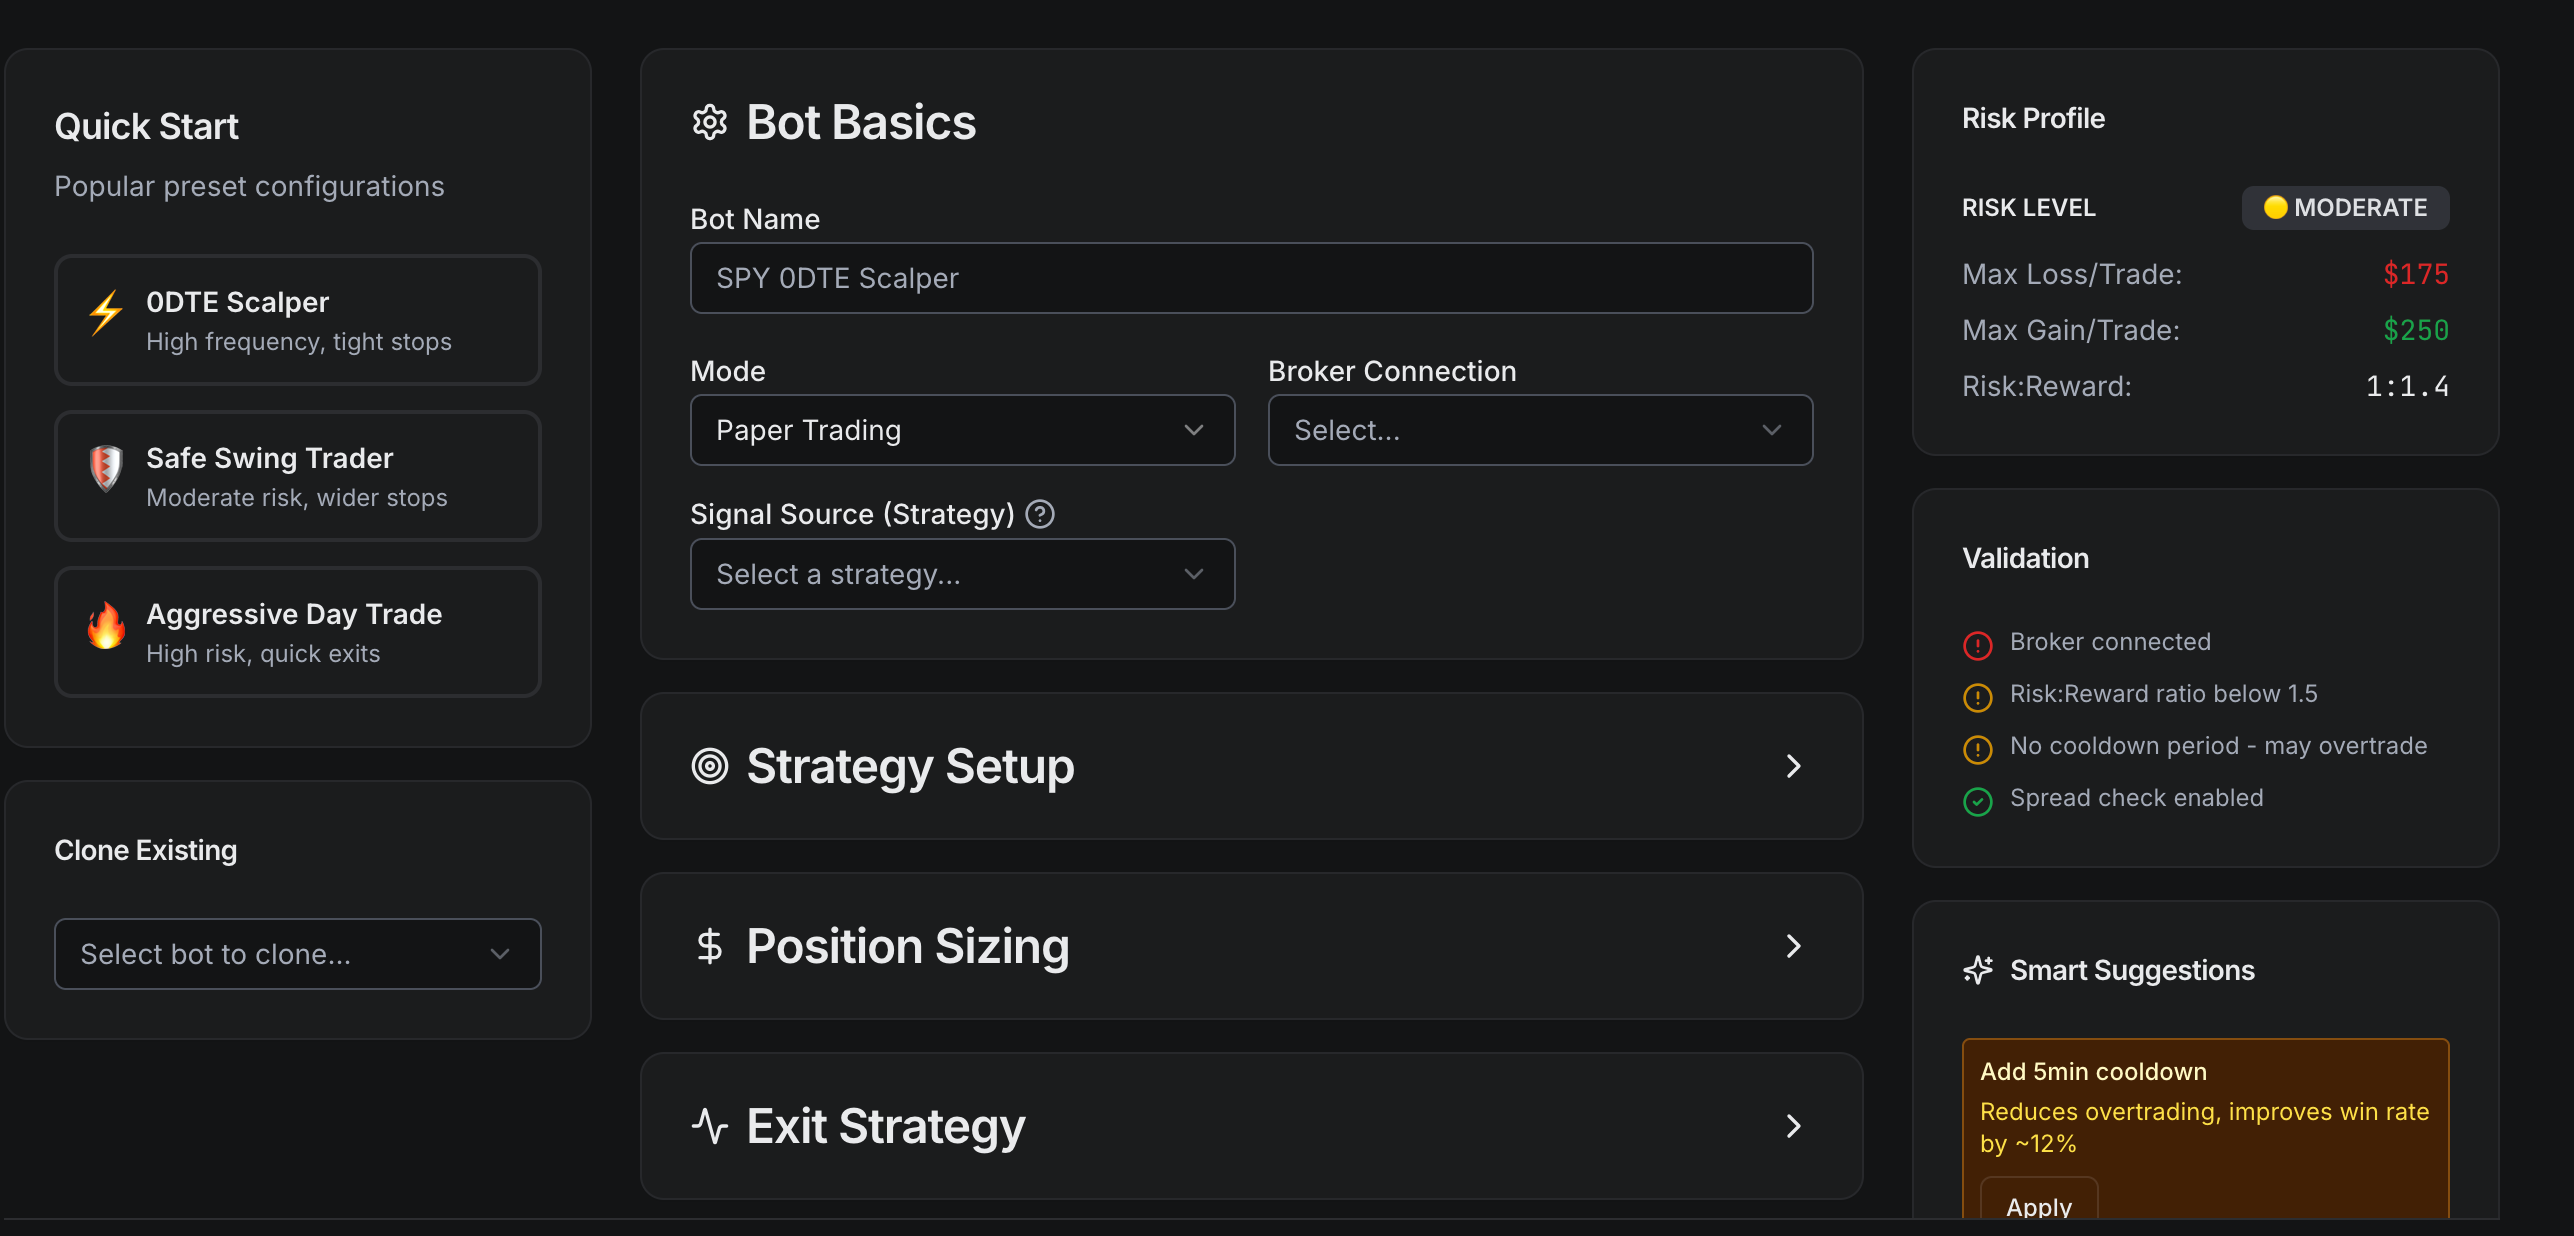
Step 4: Configure RelayDesk Bot
Head to your RelayDesk dashboard and create a new bot. This is where RelayDesk’s intelligence takes over from UT Bot’s signals.
Signal Connection
Select your Signal from drop down and then choose the stock symbol you want to trade.
Position Sizing
Choose between percentage-based or fixed-dollar position sizing. For beginners, start with 2-5% of your portfolio per trade. RelayDesk will automatically calculate the correct share quantity based on the entry price.
Exit Strategy Configuration
This is where RelayDesk separates itself from basic signal forwarders:
- OCO (One-Cancels-Other) Exits: Set both take-profit and stop-loss levels. When one triggers, the other is automatically canceled. Perfect for defined risk/reward setups.
- Trailing Stop from Entry: Lock in profits as price moves in your favor while giving trades room to run. Ideal for trending markets.
- Fixed Stop-Loss: Simple percentage or dollar-based stops for straightforward risk management.
For UT Bot strategies, OCO exits work particularly well. Try a 2:1 reward-to-risk ratio to start: if your stop is 2%, set your take-profit at 4%.
Risk Parameters
- Max Position Size: Cap per-trade exposure (recommend 5-10% max)
- Daily Loss Limit: Automatically pause trading after losing a set amount in one day
- Max Open Positions: Control how many simultaneous trades the bot can hold
Step 5: Enable and Monitor
Toggle your bot status to “Active,” and you’re officially automated. But this is just the beginning; the real value comes from monitoring and optimization.
Dashboard Overview
- Signal Feed: Real-time view of incoming alerts from TradingView
- Execution Log: Track every order placed, filled, and closed
- Performance Metrics: Win rate, average R-multiple, profit factor
- MFE/MAE Analytics: Maximum Favorable Excursion and Maximum Adverse Excursion—critical for exit optimization
The MFE/MAE data is particularly powerful. It shows you the best price your trade reached (MFE) versus the worst drawdown (MAE) before exit. This reveals whether your exits are too tight, too loose, or well-calibrated—something UT Bot alone can’t tell you.
Making It Work for Your Trading Style
Timeframe Matching
Your chart timeframe directly determines signal frequency and trade duration. Lower timeframes generate more signals but require tighter risk management and can be whipsawed by noise. Higher timeframes produce fewer signals with higher conviction but require more patience and capital allocation per trade.
- 1-5 minute charts: 5-15 signals per day, high noise, tight stops required
- 15-60 minute charts: 2-5 signals per day, balanced approach, good for active traders
- 4-hour to daily charts: 1-3 signals per week, cleaner trends, swing trading style
Exit Strategy Selection by Market Condition
UT Bot generates the entries, but RelayDesk handles the critical decision of when and how to exit. The right exit strategy depends on market behavior:
- Ranging/choppy markets: Use OCO exits with tight take-profits (1.5-2R). Lock in gains quickly before reversals.
- Trending markets: Employ trailing stops to capture extended moves. Start the trail at 1R profit, then trail by ATR or percentage.
- Volatile/unpredictable: Wider stops with OCO exits. Give trades more breathing room but maintain defined risk.
Risk Management Essentials
No indicator has a 100% win rate, including UT Bot. Proper risk management is what keeps you in the game during inevitable drawdowns.
- 1-2% rule: Never risk more than 1-2% of your account per trade when starting
- Position sizing calculator: Let RelayDesk calculate share quantities automatically based on your stop-loss distance
- Daily loss limits: Set hard stops at 3-5% daily drawdown to prevent revenge trading
- Correlated positions: Avoid running multiple UT Bot signals on highly correlated assets simultaneously
Pro Tip
The UT Bot performs differently across market conditions and asset classes. Use RelayDesk’s Research Module to analyze historical performance on your specific timeframe and symbol before committing capital. Twenty-five trades minimum before making strategy judgments.
Your First Week with Automated Trading
Setting realistic expectations prevents premature abandonment of sound strategies. Here’s what normal looks like:
Normal Behavior
- Win rates of 40-60%: Trend-following strategies like UT Bot typically win less than half the time but make more on winners than losers
- Streaks of losses: 4-6 consecutive losing trades can happen with statistically sound strategies
- Small sample noise: First 10-15 trades mean almost nothing statistically—focus on execution quality, not PnL
What to Monitor
- Execution quality: Are orders filling within 1-2% of signal price? Significant slippage indicates liquidity issues
- Signal-to-execution lag: RelayDesk should execute within seconds of alert receipt
- Position sizing accuracy: Verify that actual dollar risk matches your configured risk per trade
- Exit execution: Are OCO orders placing correctly? Do trailing stops trigger as expected?
When to Adjust vs. When to Wait
Adjust immediately if:
- Orders aren’t executing (check webhook connection, broker connection)
- Position sizes are incorrect (recheck risk calculation settings)
- Excessive slippage (>2% consistently) suggests the asset is too illiquid
- You’re getting 20+ signals per day on higher timeframes (UT Bot settings likely too sensitive)
Wait for statistical significance before adjusting:
- Strategy profitability (minimum 25-30 trades)
- Exit strategy effectiveness (20+ closed positions)
- UT Bot parameter tweaking (50+ trades to evaluate sensitivity changes)
- Risk/reward ratio adjustments (30+ trades to assess expectancy)
Success Metrics
Focus on execution quality first, profitability second. Your initial goal is confirming your TradingView signals translate to accurate RelayDesk trades with proper position sizing and exit placement. The PnL will follow once mechanical execution is dialed in.
From Setup to Strategy Optimization
You now have a complete automation workflow: UT Bot generates momentum-based signals on TradingView, TradingView alerts fire webhooks to RelayDesk, and RelayDesk executes with intelligent position sizing, OCO exits, and risk controls. No custom code. No manual order placement. No missed opportunities.
Start with paper trading and give yourself at least 25-30 trades before making strategy evaluations. Use the MFE/MAE analytics to optimize your exits—this is where most traders leave alpha on the table. The UT Bot provides solid entry signals; RelayDesk ensures you maximize its potential through professional-grade execution.
Next Steps
- Enable paper trading mode in RelayDesk
- Monitor execution quality for one week
- Experiment with Draft Bots feature to test UT Bot variations (different timeframes, Key Values)
- Join the RelayDesk Discord to share configurations and learn from other UT Bot users
- Once comfortable with execution, scale gradually into live trading
Remember: The goal isn’t to find the perfect indicator, it’s to execute a proven strategy with consistency and discipline. UT Bot provides the signals. RelayDesk provides the execution infrastructure. You provide the patience to let the edge play out.

